Show-Me Training
(Part of a series on the Rilybot 4 project.)
This is a simple, intuitive method of training robots. The hardware and software algorithms inside the robot can be quite simple, but still allow for a wide variety of behaviors: a superset of the behaviors exhibited by Braitenberg vehicles or BEAM robots equipped with up to three sensors (front and rear bump, and light).
Overview
In this simplified overview, a robot is "taught" to choose motion to the left or right depending on the level of illumination.
"Training" Mode

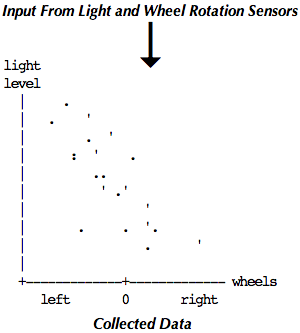
Robot continually reads its inputs, collecting data reflecting the relationship between its rate of movement and the ambient light level |
Analysis

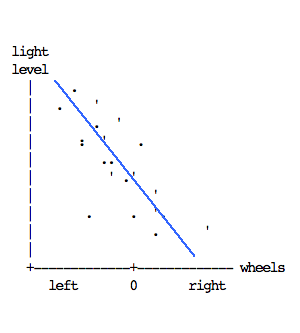
Robot uses statistics (e.g. linear regression) to model the correspondence between the two |
"Playback" Mode

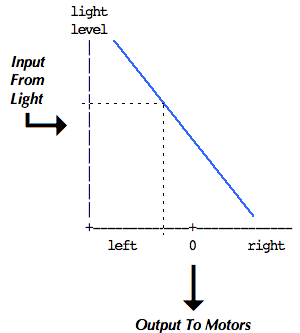
Robot continually reads the light input, derives the corresponding rate of movement, and moves the wheels accordingly |
Dog Training
Think about how you train a dog to do tricks. Well, there are two ways, actually. If you want the dog to "sit" there are two ways to train him:
- give the command, wait until he sits, then give him a reward
- give the command, physically guide the dog into a sitting position,
then give him a reward
(and of course, repeat over and over again until trained!)
the second method (in which the owner gently guides the dog through the desired motions) is what I call Show-Me training.
Robot Training
Suppose you have a robot that has two motors (A and B) connected to left and right wheels, and a third wheel (for balance) that just pivots and rolls like a caster. It also has one touch sensor, placed behind a bumper on the front of the robot. It also has a button called "TEACH" and another called "GO".
Suppose you want to train this robot to move straight forward until the touch sensor gets hit, then stop, reverse motor A for a little while, then resume forward motion. The way to train it via the Show-Me method is:
- press and hold the "TEACH" button
- roll the robot forward
- bump its touch sensor against something
- roll the robot backward on a curve
- roll it forward again
- release the "TEACH" button
the robot's firmware would:
- observe the TEACH button being pressed
- observe the motors both moving forward (via generated voltage)
- observe the touch sensor getting hit
- observe the stop/reverse motion
- observe that forward motion has resumed
- observe TEACH being released
and would encode this as a program with a single initial motion and a single stimulus-reaction motion:
turn on motor A clockwise turn on motor B counterclockwise while (true) { if (touch) { stop motor A turn on motor B clockwise wait 1.5 seconds stop motor B turn on motor A clockwise turn on motor B counterclockwise } }Flexible and Adaptable
In this first example I had two motors going in opposite directions. Perhaps the robot is built that way — the motors are on opposite sides of the chassis, one with its output shaft pointing right and the other pointing left, thus if they both rotate clockwise the chassis would turn in little circles.
But suppose the builder rebuilt the robot so that the motors point the same way, adding gears to make it so that you have to run both motors clockwise to get forward movement. Now the robot needs to be reprogrammed to get the same behavior. The user would simply repeat the Show-Me training and the robot would learn that it should turn one of the motors the other way. The robot doesn't even need to know what has been changed — as far as it knows, maybe it's being trained to turn in circles.
If the software wanted to be fancy it could even measure the speeds and delay timings. I have implied part of this in the above example, in the pseudocode line that says "wait 1.5 seconds". A much richer set of behaviors would result if the firmware noted the motor speed, and kept track of how much variation in speed takes place. Statistics such as mean speed, standard deviation, frequency of changes, rate of acceleration, etc. could all be gathered and used as parameters in a pseudo-random motion generation function used during GO mode (behavior playback).
Analog variable inputs (like light sensors) that aren't just "on" or "off" allow for an even more elegant form of programming. Statistics for the motors and the input are taken simultaneously and accumulated on a scatter graph:
light level | . | . ' | . ' | : ' . | .. | ' .' | ' | . . '. | . ' | +-------------+------------- motor left 0 rightThe points are widely scattered, but there is a correlation that can be roughly described by saying that the motor goes faster at lower light levels. This data can be analyzed by the firmware using standard two-variable linear regression, and the resulting slope, intercept, and correlation coefficients used to generate behavior during GO (behavior playback) mode.
In fact, the same concept can be generalized to a multivariable linear correlation technique that correlates all of the inputs with all of the outputs. "Inputs" and "outputs" can be actual raw input levels and motor speeds, or derived parameters such as mean, standard deviation, frequency, rate of change, etc. The correlation would be stored as a matrix that maps a vector of input values onto a vector of output values. Such a multivariable linear correlation system would include all of the behaviors possible in the simpler training systems described above. That is the algorithm implemented in the "RILYBOT 4" that I showed at Mindfest 1999.
Intuitive
This is about as intuitive as robot programming can get. All the user has to do is push the robot around and make it react to inputs in the desired way. Telling it what sensor readings to react to happens automatically as a part of the training. Reprogramming to get a different behavior takes all of 5 to 10 seconds.
GPL notice: This document and the ideas contained herein are Copyright © 1999-2024 Robert P. Munafo. The source code is provided under the GNU General Public License version 3.0, and the rest under the Creative Commons license as linked from the footer. See the FSF GPL page for more information.
LEGO® creations index
The graph paper in my newer photos is ruled at a specing of 1 LSS, which is about 7.99 mm.
This site is not affiliated with the LEGO® group of companies.
LEGO®, Duplo®, QUATRO®, DACTA®, MINDSTORMS®, Constructopedia®, Robotics Invention System® and Lego Technic®, etc. are trademarks or registered trademarks of LEGO Group. LEGO Group does not sponsor, authorize or endorse this site.
All other trademarks, service marks, and copyrights are property of their respective owners.
If you want to visit the official LEGO® site, click here
Parts images are from LUGNET. On this page they explicitly give permission to link to the images:
Note: you may link (as in, Yes, it's OK) directly to these parts
images from an off-site web page.
This page was written in the "embarrassingly readable" markup language RHTF, and was last updated on 2014 Dec 11.
 s.27
s.27